How Do I Access Azure Blob Storage From My Browser Effortlessly?
Securely Access Azure Blob Storage Containers In C# With Sas Tokens \U0026 Generate Download Urls Az-204
Keywords searched by users: How do I access Azure blob storage from my browser access azure blob storage via url, how to access azure blob storage from browser, how to access azure blob storage using access key, azure blob storage url with access key, azure blob storage url example, how to upload folder to azure blob storage, azure blob browser, Azure blob storage javascript
How Do I Access Azure Blob Storage From The Internet?
If you want to access Azure Blob Storage from the Internet, you’ll need to create a Blob Storage container in your Azure Storage account. Here’s a step-by-step guide to help you get started:
-
Access the Azure Portal: Begin by logging into your Azure account and navigating to the Azure Portal.
-
Locate Your Storage Account: Once you are in the Azure Portal, find your storage account. You can typically find it in the left menu under the “Data storage” section.
-
Create a Container: In the storage account settings, locate and click on the “Containers” option. To create a new container, select the “+ Container” button.
-
Name Your Container: Give your new container a unique name. Container names must be lowercase and can include letters, numbers, and hyphens. Avoid special characters or spaces.
-
Set Permissions (Optional): Depending on your use case, you may want to configure access permissions for the container. You can control who can read, write, or delete objects within the container.
By following these steps, you can create an Azure Blob Storage container and configure it for Internet access, making it ready to store and retrieve your data. Keep in mind that proper security measures and access controls should be implemented to protect your data stored in Azure Blob Storage.
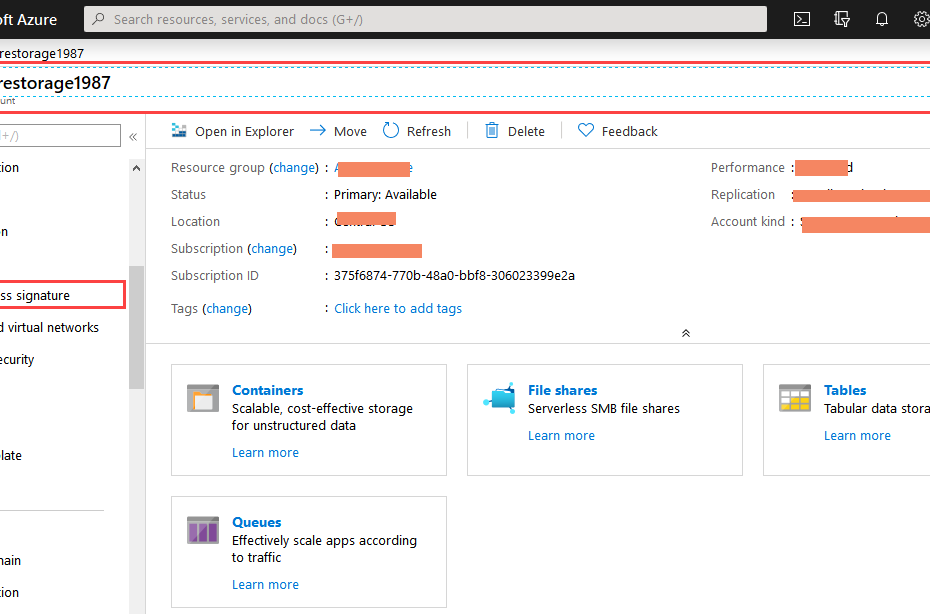
How Do I Access Azure Blob Storage In Azure Portal?
To access Azure blob storage through the Azure portal, follow these steps:
-
Begin by logging into the Azure portal.
-
Once you’re in the portal, locate and select your storage account. If you’re unsure where to find it, you can use the search bar at the top of the portal.
-
Within your storage account, navigate to the list of containers. This is where your blob data is organized.
-
Identify the specific container for which you want to generate a Shared Access Signature (SAS) token. Click on the checkbox next to the container’s name to select it.
-
With the container selected, look for the “More” button, typically represented by three dots (…). Click on it to reveal a menu of additional options.
-
From the menu, choose “Access policy.” This action will open the Access policy pane, which is where you can configure the permissions and settings for your SAS token.
By following these steps, you’ll be able to access Azure blob storage in the Azure portal and generate an SAS token for your selected container, allowing you to control and manage access to your blob data. Please note that the interface and specific steps may evolve over time, so it’s essential to consult the latest Azure documentation for the most up-to-date instructions.
How Do I Retrieve Data From Azure Blob Storage?
Retrieving Data from Azure Blob Storage: A Step-by-Step Guide
Introduction:
This tutorial provides a comprehensive guide on how to retrieve data from Azure Blob storage using Azure Import/Export. To successfully complete this process, you will need to follow these steps:
Step 1: Set up the Prerequisites for Exporting Data
Before you can begin exporting data from Azure Blob storage, it’s crucial to ensure you have all the necessary prerequisites in place. This includes setting up Azure Import/Export.
Step 2: Create an Export Job
Once you’ve established the prerequisites, the next step is to create an export job. This job will initiate the process of transferring the data from Azure Blob storage to the specified destination.
Step 3: Ship the Drives
After creating the export job, the physical transfer of data begins. This involves shipping the drives containing the data to the designated location.
Step 4: Update the Job with Tracking Information
To keep track of the progress of your export job, it’s important to regularly update it with tracking information. This step ensures that you can monitor the location and status of your data during transit.
Step 5: Receive the Disks
Once the drives reach their destination, they will need to be received by the designated personnel. This step involves physically retrieving the disks.
Step 6: Unlock the Disks
Upon receiving the disks, the final step is to unlock them. This allows you to access the data stored on the drives.
By following these steps, you will be able to successfully retrieve data from Azure Blob storage using Azure Import/Export. Please note that this tutorial is current as of February 23, 2023, and is based on the latest available information.
Discover 34 How do I access Azure blob storage from my browser


Categories: Top 10 How Do I Access Azure Blob Storage From My Browser
See more here: trainghiemtienich.com

To access Azure Blob Storage via URL, you need to create a shared access signature (SAS) and use it to access the Blob Storage URL.In the Azure portal, navigate to the list of containers in your storage account. Select the checkbox next to the name of the container for which you’ll generate an SAS token. Select the container’s More button (…), and select Access policy to display the Access policy pane.
- Go to your new storage account in the Azure portal.
- In the left menu for the storage account, scroll to the Data storage section, and then select Containers.
- Select the + Container button.
- Type a name for your new container.
- Prerequisites to export data from Azure Blob storage with Azure Import/Export.
- Step 1: Create an export job.
- Step 2: Ship the drives.
- Step 3: Update the job with tracking information.
- Step 4: Receive the disks.
- Step 5: Unlock the disks.
Learn more about the topic How do I access Azure blob storage from my browser.
- How do I Access Blob Storage? A Step-by-Step Guide
- Tutorial: Access Azure Storage from a web app – Microsoft Learn
- Manage blob containers using the Azure portal – Microsoft Learn
- Tutorial to export data from Azure Blob storage with Azure Import/Export
- Get started with Storage Explorer | Microsoft Learn
- Search over Azure Blob Storage content – Microsoft Learn